
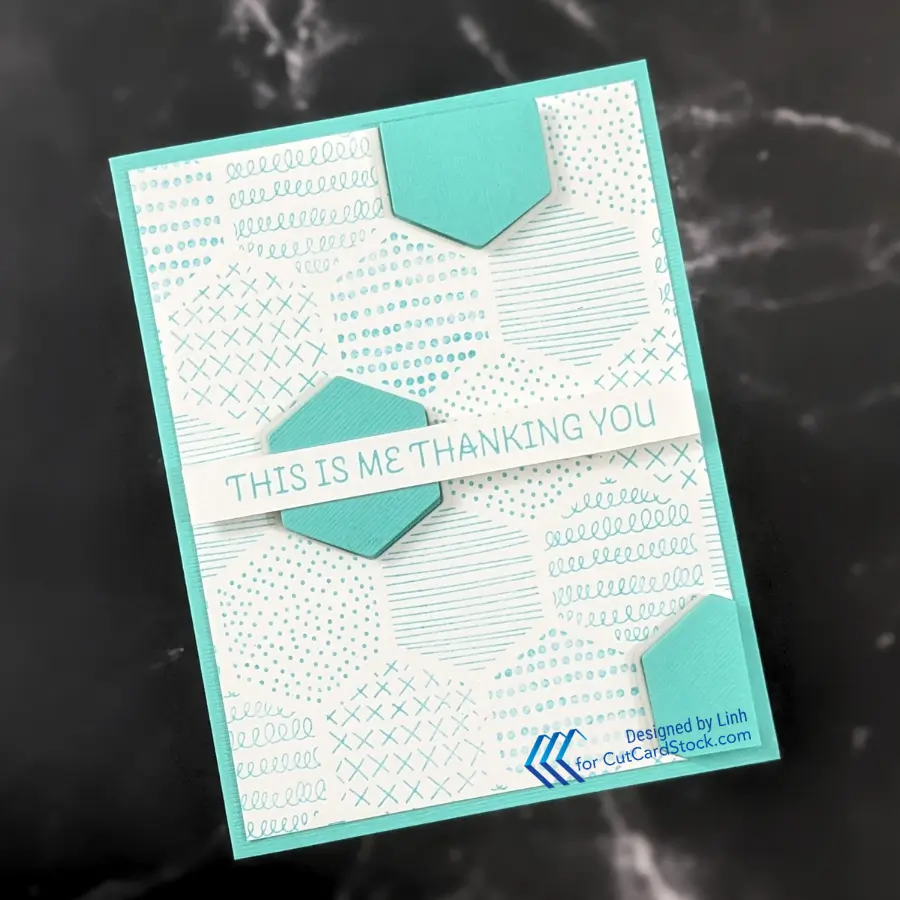
Did you know you can get 100% cotton card at CutCardStock? Cotton Cardstock is so beautiful and it’s great for special occasions (think wedding invitations) or just an every day card to say thanks, like the one I’m making today. I love that CutCardStock has these panels available in pre-cut panels, making it super easy to craft with! Whenever I do letterpressing, I like to keep it simple, so the design and the paper itself shines.
Supply List
| Cardstocks | Other Supplies |
|---|---|
| 100% Cotton Card DSC Textured Caribbean Blue Cougar White Shop CutCardStock (affiliate link) | Dies, Stamps, etc. * Spellbinders Betterpress Club (Sept 2025) * Dina Wakley Betterpress Ink The above are all affiliate links |

Let’s Make This Card
Step 1. Letterpress your card
- Ink up your Betterpress plate. I like make multiple passes with the ink pad especially on a large background panel design like this one. It helps ensure you have good coverage.
- Adhere your 100% Cotton Card to the platen (clear plate). I use a roll of removable tape so the design can be pressed into the entire panel (which is A2 in size)
- Run your Bettepress sandwich through you die cutting machine on the emboss setting.


Step 2. Create Your Cardbase and Trim the Letterpress Panel


To create a card base, cut a sheet of DSC Textured Caribbean Blue to 5.5″ tall by 8.5″ wide. Along the 8.5″ edge, score in half at 4.25″.
Next, cut your letterpressed panel to 4″ wide by 5.25″ high. This will leave a solid border (from the card base) around the panel.
Step 3. Cut 3 Hexagons From the Design
This Betterpress panel comes with a coordinating die to cut out a single hexagon from the design. However, you can do this with any pattern and any shape. It doesn’t really need to line up perfectly. What I like to do though is cut 3 shapes out. It’s nice to cut off the edge as well as this makes it feel more organic.
Using the same shape die, cut the same DSC Textured Caribbean Blue cardstock and set those aside.
Next adhere your letterpressed panel to the cardbase. I prefer to do this directly without any foam.


Step 4. Inlay Solid Hexagon Die Cuts


Next, you’ll want to inlay the solid hexagons in those open areas we die cut out of the letterpressed panel. However, I like to add some foam behind these die cuts to have some dimension and interest.


If you chose to cut off the edge of your panel, you’ll want to create a solid color die cut that is the exact same so you can inlay into those open areas at the edge. To achieve this, I line up the part of the panel that was cut out on top of a whole piece (that is solid cardstock) and I trace a line. You could also cut directly so you have the same size die cut in solid color.
Step 5. Add a Sentiment

Once all the solid hexagons are adhered (with foam behind them), I finish up the card with a Betterpress’ed sentiment strip.
Picture Gallery

Enjoy!

I love Love LOVE This Color Combo!!! (Of cousre, Blue has always been My Absolute Favorite Color & I just adore ALL shades of Blue/Teal! LOL!);~🙏💙🙏~