
OK… “Mastering” might be a stretch but with the help of Meg Dave’s Clean & Simple Masterclass during Masculine Makes Masterclass Series, I learned this really versatile card design that can be easily adapted and varied to suit any occasion! This is also a really wonderful scrap-buster! So bring out all those strips of cardstock and let’s use them up!
Supply List
| Cardstocks | Other Products |
|---|---|
| Cougar White Smooth Cardstock PopTone Blue Raspberry DSC Canvas Textured Pink Tutu | Spellbinders Clear Stamp & Die of the Month (Jan 2025) T-square Ruler |

For video instruction, you can watch this tutorial.
Let’s Make This Card
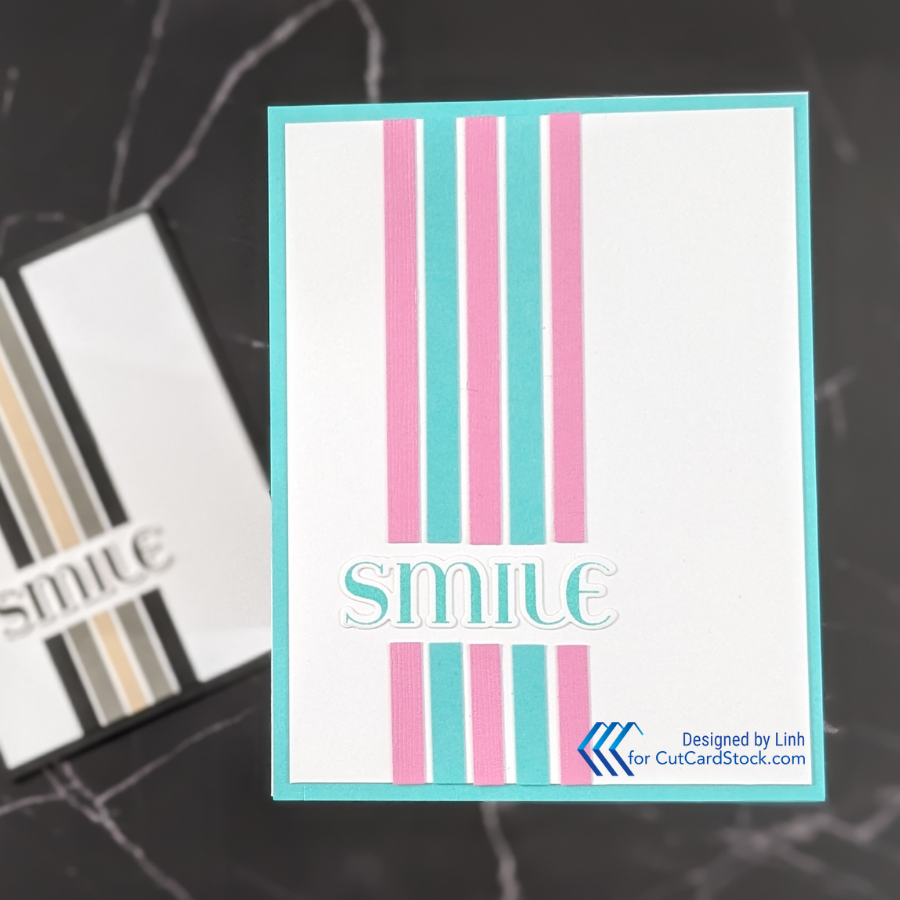
Step 1. Cut your cardstock
- 8.5″ x 5.5″ Card base from Cougar White Smooth Cardstock
- 4″ x 5.25″ Panel from Cougar White Smooth Cardstock
- 4.25″ x 5.5″ Panel from PopTone Blue Raspberry
- 0.25″ Strips out of PopTone Blue Raspberry
- 0.25″ Strips out of DSC Canvas Textured Pink Tutu


💡TIP: Add a strip of dry adhesive tape to the back of your 1/4″ strips.
Step 2. Stamp and/or Die Cut Your Sentiment
For this design, use a large sentiment that has an even height all the way across. It will look better than a sentiment that has ascenders and descenders. Typically a font that is all-caps works well. I chose to stamp and die cut. I stamped from a teal ink close to the Blue Raspberry cardstock.

Step 3. Adhere Your Sentiment to the 4″ x 5.25″ Panel
I like to adhere the sentiment off-center both vertically and horizontally. But this design would look good if you centered horizontally. But I would still position the sentiment more towards the bottom of your card.
Step 4. Adhere your 0.25″ strips ABOVE your sentiment
I like to start in the center of my sentiment and I glue a strip of DSC Canvas Textured Pink Tutu about 1/8″ above the sentiment. The strip can run off the top of the panel and be trimmed off. Then I adhere a strip of PopTone Blue Raspberry to the left and right of the first strip. I like a small gap of white to show — maybe 1/16″ of an inch. Finally, I add two more strips of DSC Canvas Textured Pink Tutu — one on either end.
💡TIP: If you want to be precise, you can use a T-square ruler to make sure your strips are straight up and down.

Step 5. Adhere your 0.25″ strips BELOW your sentiment
Repeat the process above but this time glue the strips below the sentiment following the same pattern.

Step 6. Assemble your card
Glue the 4.25″ x 5.5″ PopTone Blue Raspberry to your card base. It should cover the entire front of your card. Then glue the panel you just created on top.
Try These Fun Variations
This clean and simple card can be so easily created. It’s very versatile and you can subtly change the look by trying different variations:
- Different color combinations
- Create different patterns with your strips
- Use specialty cardstocks
- Rotate the card and try a landscape orientation
- Try centering the sentiment horizontally
- Use foam for some added dimension
Picture Gallery


Enjoy!

I like the design. It is colorful and also simple. I would write the word in calligraphy.
Thank you so much! ❤️