
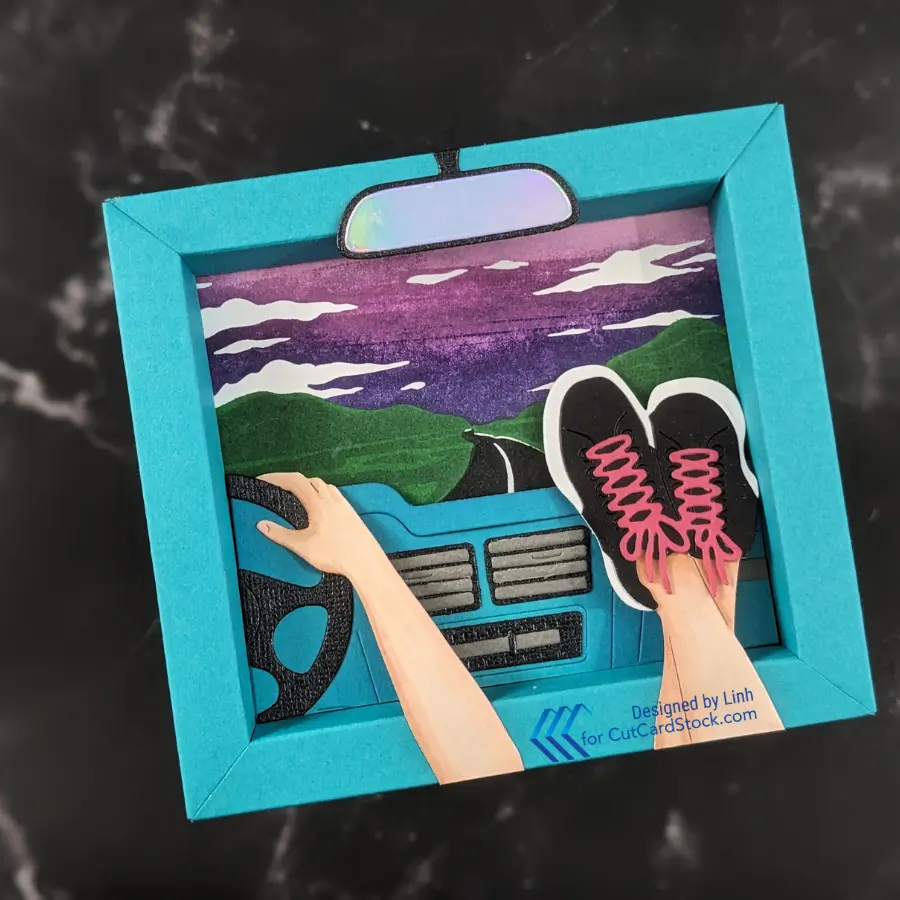
I had a lot of fun making this card. It’s all about the soft pastel rainbow colors and layers. So many layers! I love that this card has some randomness but the solid blocks of color make it still feel somewhat clean and simple.
Supply List
| Cardstocks | Other Supplies |
|---|---|
| DCS Pewter Grey DCS Aqua DCS Pearlized Gunmetal Black Cougar White Smooth Cardstock Shop CutCardStock (affiliate link) | Dies, Stamps, etc. * Hero Arts Card Kit of the Month – July 2025 * We R Makers Shadow Box Punch Board Basic Supplies * VersaFine Claire Ink Pads * Altenew Stampwheel * Die Cutting Machine The above are all affiliate links |

If you like video tutorials, you can watch my tutorial on YouTube.
Let’s Make This Card
Step 1. Cut Your Pieces and Assemble
- Arms, Legs and Shoes – Cougar White Smooth Cardstock
- Shoes (back), Steering Wheel, Radio, Vents, Rear Mirror – DCS Pearlized Gunmetal Black
- Car Accents – DCS Pewter Grey, DCS Pearlized Gunmetal Black


For the skin of the arms & legs, I used alcohol markers to color them in.
Step 2. Score and Punch Your Shadow Box


I start a piece of DCS Aqua cut to 8.5″ x 9″. I followed the directions for scoring all four sides and puncing all four corners. Next, I folded and burnished all the score lines.
Step 3. Secure Top & Bottom of Shadow Box
I want my shadow box to have an interchangeable scene. To do that, I cut a slit through the top where the back of the box would be. I cut about 1/16″ away (basically removing the score line. Next, I glued down the bottom wall of the shadow box as normal.


Step 4. Secure Left & Right of Shadow Box
I placed my scene inside the shadow box and drew some pencil marks around it. This shows me the space that the scene will take up, but more importantly, it shows me where I can’t have any glue (so the scene can slide in and out. To secure the left & right sides of the shadow box, I carefully put glue outside the pencil marks.

Step 5. Decorate the scene!
With the shadow box assembled, I can now decorate the scene! I used some foam behind the car dashboard to give it a bit of depth and dimension. Then I attached the arms and legs so part of it is adhered directly to the dash and part of it is adhered to the shadow box frame. Be careful not to attach anything to the scene itself – that still needs to be pulled in and out.


I punched a notch on the back of the shadow box to give me a way to grab the interchangeable scene. Then I snipped of everything that’s hanging off or outside the shadow box. The result is a fun shadow box – perfect for any time of day!
Picture Gallery

Enjoy!
