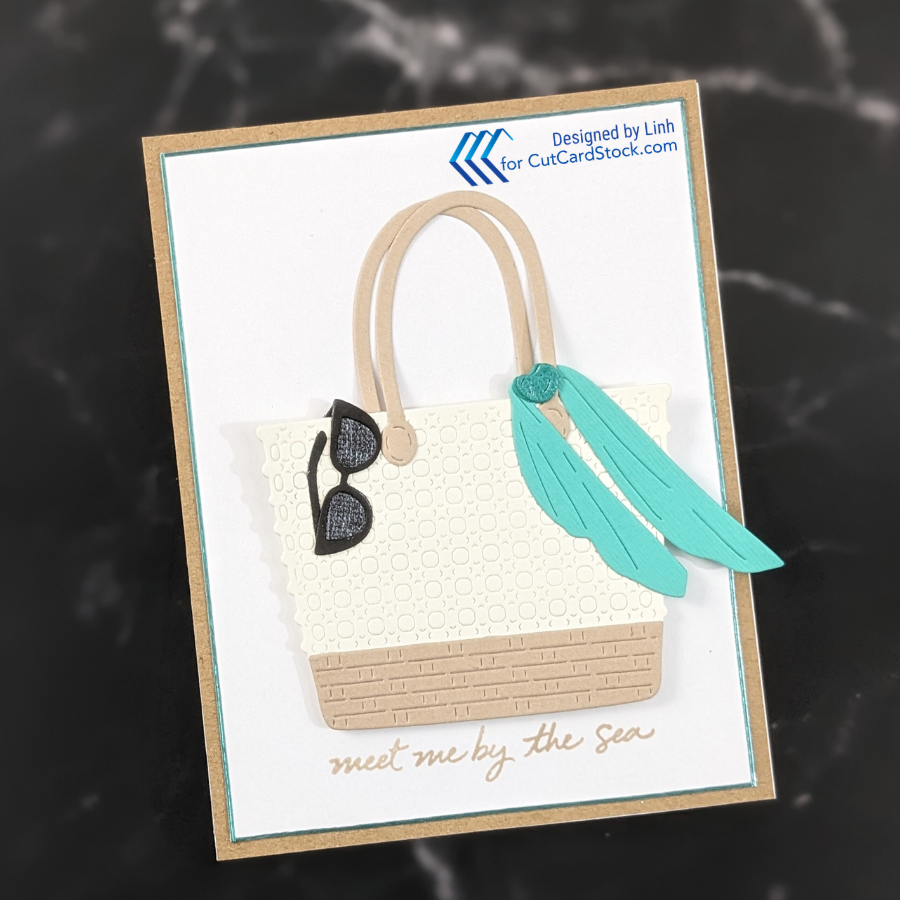
I struggle with clean & simple and the only way to get better at something is to keep at it! For this card, one thing I focused on is keeping a minimal color palette and a very simple layout. The minimal color palette really helps us focus on the textures and the small pops of color that are on the card.
Supply List
| Cardstocks | Other Supplies |
|---|---|
| DCS – Textured Pearl Hummingbird Teal DCS – Textured Pearl Gunmetal DCS – Textured Caribbean Blue DCS – Natural White DSC – Sand Castle Pop Tone Black Licorice Cougar White Smooth Cardstock | What You’ll Need: * Hero Arts Cardmaking Kit June * VersaFine Claire Ink – Sand Dune * Foam Adhesive * Love From Lizi Pinstripe Stickers * Kraft Cardstock * Misti Stamping Platform |

Let’s Make This Card
Step 1. Cut Your Pieces and Assemble
- Scarf: DCS – Textured Caribbean Blue
- The knot of the scarf: DCS – Textured Pearl Hummingbird Teal
- Base of the sunglasses: DCS – Textured Pearl Gunmetal
- Sunglass frame: Pop Tone Black Licorice
- Tote Bag: DCS – Natural White
- Base of Tote, Handle of Tote: DSC – Sand Castle
- 4″ x 5-1/4″ Panel: Cougar White Smooth Cardstock
- A2 Card base: Cougar White Smooth Cardstock

For the Tote bag, the die is actually meant to cut all the way through, but I like the waffle pattern that’s embossed when the die doesn’t cut through so I put a layer of scrap cardstock on top of the DCS – Natural White. The result is that the die cuts through the scrap completely but it only partially cuts into the DCS – Natural White layer, which is the piece I want to use. The result is a really lovely emboss.
💡TIP: If you have adhesive sheets, you can apply your adhesive sheet to your cardstock and then die cut to create stickers out of these pieces!
Step 2. Stamp You Sentiment
I don’t always use a stamp positioning tool, but when I stamp with a light color ink like VersaFine Claire Ink – Sand Dune, I do like to stamp multiple times. This helps to darken the the ink a little to make it more legible
Step 3. Add Your Layers
I adhered a Kraft cardstock panel that’s A2 in size to start my card. I added a very thin Pinstripe Sticker to the white panel (with our sentiment). This helps to add a touch of color that ties in with the teal scarf on our tote bag.

Step 4. Add Your Focal Image
Sometimes love keeping everything really simple — not just the layout but the colors as well. That makes accessories like the teal scarf and sunglasses really pop. Adding a little dimension with some foam helps to create a bit of shadow and interest on an otherwise simple card.
Picture Gallery

Enjoy!


