
I’ve been scrapbooking for over 25 years, but making handmade cards is a new love. I get to use all the same materials and techniques and best of all I get to share my creations with friends and family. Personalizing cards make them so much more special. In some ways the card is a gift in and of itself because it’s one-of-a-kind and made with love just for the recipient.
If you’ve ever wanted to start making handmade cards, put aside your hesitations and dive right in! You don’t need to have artistic skills, you don’t need a lot of money, and you don’t even need expensive tools & equipment. You just need some materials and some creativity.
This will be the first in a series of post. Each post will have recommendations based on how many cards you want to make. This way, you’ll know what you need and in some cases whether it’s worth it to invest in bulk supplies or special tools.
Just Dipping My Toe
If you aren’t quite committed to making handmade cards yet, and you just want to make one (or a couple) to try your hand at it, then it doesn’t make sense to invest in a lot of equipment or buy materials in bulk. Not a problem. While the cost is fairly minimal (easily under $10), the quality of card will shine and impress! Here’s what you need and how you can make your own handmade card!
Materials & Shopping
Many of the items below you may already have at home and can save yourself some money. If you don’t happen to have it at home, don’t worry, even if you have to buy everything on this list, you can get it all for $10 or less!
- Card stock and/or specialty paper
- Envelope
- Card base
- Adhesives (dry, liquid, foam)
- Embellishments
- Gift bag
- Scissors
- Ruler
NOTE: You can shop with my links, which are to products on Amazon. It’s convenient to have it come to your door, but you will ultimately be buying WAY more supplies than what you need to make just a card or two.
I recommend following my shopping strategy below to minimize your investment and buy just the bare minimum necessary.
Please also check out my disclaimer regarding links and mentions of other vendors.
Let’s get inspired! Sometimes it’s hard to get started. If you have a particular occasion and/or card recipient in mind, use that as your design inspiration.
To get my creative juices flowing, I like to visit my local craft store — Joann’s, Hobby Lobby, Ben Franklin, etc. You can find cardstock and specialty pattern paper sold in single sheets (8.5″ x 11″ or 12″ x 12″), so you don’t have to buy in bulk. They generally sell for under $1 / sheet and if you have coupons or wait for sales, you can get them for under fifty cents even. You don’t need a lot for just a couple cards. I recommend giving yourself design options though, and I would choose the following:
- 1 Specialty design paper in any design. Keep in mind that you will use about a 4″ x 6″ section of it for your card, so make sure the design looks good when it’s cut down to size.
- 1 Pattern paper that is a simple repeating pattern. This could be stripes, polka dots or anything that has a repeating pattern. Find a pattern that coordinates with the design you’ve chosen
- 1-3 Heavyweight Cardstock in coordinating colors or neutral colors (e.g. white, black, grey, kraft, ivory, etc.)
The easiest way to find a coordinating color is to choose colors found in your main pattern. An exact match isn’t necessary – feel free to go a shade darker or lighter if you want. Give yourself some variation in both color and in the pattern (simple vs. complex). When you hold all your paper together, they should all go together.
For just a couple bucks, you’ll have enough cardstock to make several cards.
Next Stop: Dollar Tree
I recommend hitting up your local Dollar Tree next. You can find everything else you need here… and you won’t be compromising on quality or design!
First up — find two greeting cards (it’s usually two for $1). It doesn’t matter what the design is – just make sure it’s flat (no glitter, embossing or embellishments). Look inside the card to ensure the sentiment makes sense once the outside of the card is covered. Humor cards in particular often require the front of the card for the punchline to make sense. Also, some cards have colored cardstock, so you’ll want to make sure it matches your color scheme.
Now you have two card bases and envelopes to match! These cards should be a heavy weight cardstock and serve as a sturdy foundation on which to build your handmade card.
Cardstock – This is a type of paper that is typically thicker and stiffer than your standard letter or copy paper. It comes in a huge variety of colors and textures.
Specialty Pattern Paper – This is a broad category of papers and basically refers to any paper that already has a printed pattern or design on it. This is one way you can make beautiful cards without artistic skills!
Paperweight – The “weight” or thickness of paper is measured in either “pounds (lbs)” or “grams per square meter (gsm)”. When I compare paper weights, I always look for GSM because that’s a universal measurement that always means the same thing. Typically, you’ll want 215 gsm or higher. Paper measured in LBS aren’t universal because the thickness depends also on the type of paper – text, index/bond or cover. Not all 80-lb paper is the same thickness. For card making, you want at least 80-lb COVER paper.
Card Base – The is generally a heavy weight cardstock that is folded and serves as the core card onto which you add your design elements.
You’ll be adhering your design elements to your card base, so you’ll need some glue. There are three main types of glue, depending on what type of card you want to make:
- Tape runner. This is double-sided tape rolled up in a handy dispenser which easily and quickly lays down a strip of dry adhesive to your paper. It’s permanent, fast bond and perfect for adhering paper to each other. This isn’t always available, but if it is, definitely pick some up!
- Foam adhesive. This can generally be found in the tools section. This is foam with adhesive on both sides and comes pre-cut in convenient rectangles. These are used to add dimension and layers to your card. If you want to make a shaker card, these are essential!
- Liquid craft glue. This can be found in the craft section where the glitter and paint is. Craft glue is good for attaching embellishments to your card. Tacky glue is a good option if you can find it – it’s better than regular school glue because it won’t turn yellow or become brittle over time.
While you’re still in the craft section, look for embellishments. The Dollar Tree has sequins, ribbon, twine, gems, etc. The variety is limited, so be sure whatever you get it matches with the paper you just bought.
Another aisle to visit is the gift bag and wrapping paper section. Look for a bag with words that fit the occasion of the card you’re making (e.g. “Happy Birthday”). Make certain the words fit on your card. You also want to be sure you can cut out the words without any other design or pattern interfering with it. It’s best if the words are on a solid background (preferably a neutral or coordinating color). If you’re like me and you save all your gift bags, you may even already have something at home that would work! If you have good handwriting, you could just skip this altogether and write your own sentiment!
Finally, if you don’t happen to have a pair of scissors and ruler at home, you can pick those up at the Dollar Tree too!
For $10 or less, you now have everything you need to make handmade cards!
Making Your First Handmade Card
While it seems like you don’t have many materials, your design options are endless. I’ll walk you through a very basic, simple, but impressive way to put these materials together. It’s a simple layering technique that you can use in a multitude of ways.
I like to cut and prepare all my elements before I start attaching anything. This way I can move things around, change things up and just play a little before committing to anything.
A nice solid border often adds elegance to a card. To make your border, choose one of your solid color cardstocks. Measure the size of your card base (while it’s folded) and cut the same size out of the cardstock.
Next, let’s add your specialty pattern paper. You’ll need to cut this piece to be smaller than your card base by 1/4″ or 1/2″ inch — depending on how wide of a border you want. For example, if your card base is 4″ x 6″, then you can cut your pattern paper down to 3.5″ x 5.5″ to give yourself a 1/4″ border all around.
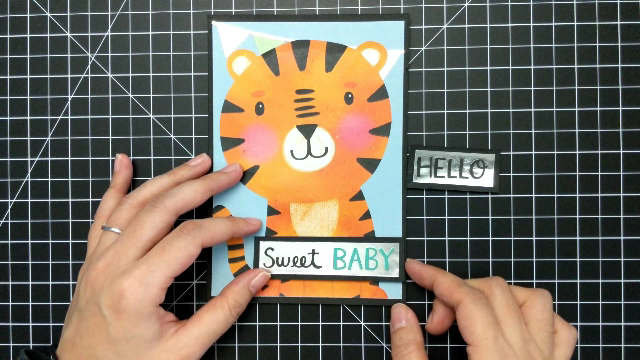
Now, create your sentiment. Cut out the words you want to use from the gift bag / wrapping paper. Let’s also give your sentiment a border by cutting a piece of cardstock 1/4″ wider and taller than the sentiment. Use a tape runner to attach the sentiment to the cardstock border.
If you bought foam adhesive, pop a few pieces of foam on the sentiment. Be sure to get each corner at a minimum and if it’s a large sentiment, perhaps a few in the center too. Don’t remove the backing paper just yet. This way you can move it around your card before attaching it.
Time to play! You can start layering your elements now to see how to line up your sentiment and how it all looks together. I like to start minimal and then add as needed.
Perhaps a touch of ribbon or sequins would be nice. If you have a change of heart and want to try a different border color, you can easily cut a new border panel. Or if you want to see how the the simpler pattern paper would look, try that too! Because you bought everything to coordinate, it should all go together. It’s just a matter of personal taste. And what you don’t use on this card can always be made into a second card!
Just play and let your creativity soar!
When you have your design set, it’s time to put it all together!
First, the border panel goes onto the card base. You’ll want to use your tape runner here.
Next up, the pattern paper. This can be adhered with tape runner too. If you want this layer to have dimension, it does need to be sturdy enough to not cave in. If your specialty paper isn’t thick enough, just cut a piece of cardstock the same size and adhere the two with tape runner. Then put foam adhesive squares in the corners and a few in the center — in particular you’ll want foam behind where your sentiment will be.
Then can add your sentiment. Just peel off the release paper from the foam squares or apply tape runner if you aren’t using foam and place it where you want.
And finally, if you decided on extra embellishments, you’ll want to use your liquid craft glue to attach those.
Now you have a finished card! Congrats!! I’ve seen handmade, boutique cards sell for $10 each, and for under $10 you have enough supplies to make a few cards!
Hopefully you’re convinced that making handmade cards is not only economical but fun! It doesn’t require a lot of special tools and materials. In fact, you may even have a lot of things around your house that you can use. If cardmaking is not for you, at least you tried your hand at it and haven’t put a ton of money into it!
If you you want to grow your cardmaking and take it to the next level, check out my other posts (). In these posts, I recommend products and tools that may be worth the investment if you see yourself making more than just a couple cards.
DISCLAIMER: This website contains affiliate links, which earn me a small commission at no additional cost to you if you purchase from my link. For more details, check out my Affiliate Disclosure.